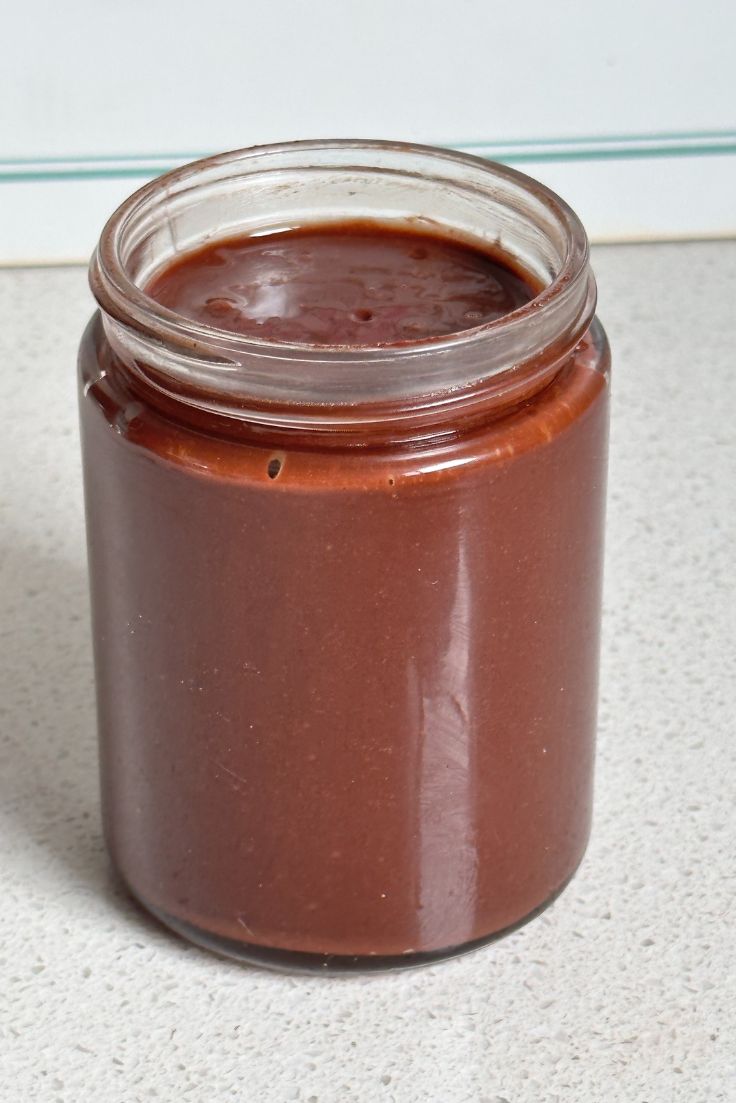
I used to love Nutella, but when I learned about the ingredients, I decided to make my own Homemade Chocolate Hazelnut Spread. I’ll never forget that grey, drizzly afternoon, my kitchen filled with the comforting, nutty aroma of gently roasting hazelnuts. I watched them transform, blending into a warm, silky butter before I swirled in pools of rich, melted dark chocolate and a final pinch of sea salt.
I was amazed at how easy it was to create a truly healthy Nutella alternative that tasted so divine. The result is a luscious, velvety, and completely dairy-free chocolate spread that’s perfect on toast or straight from the jar. This vegan chocolate hazelnut spread is made with simple, natural ingredients and is completely free of unwanted additives. It’s a little jar of pure, guilt-free happiness.

A Creamy Homemade Alternative to Your Vegan Lifestyle
This vegan chocolate hazelnut spread offers healthy monounsaturated fats from hazelnuts, antioxidant-rich cocoa, and optional natural sweeteners like coconut sugar or maple syrup. It’s a healthy chocolate hazelnut spread that’s dairy-free, gluten-free (if you choose), and free from palm oil. With heart-supporting nutrients and simple ingredients, this plant-based chocolate spread delivers both taste and nourishment in every jar.
Simple Tutorial on Homemade Chocolate Hazelnut Spread
Fancy making your homemade chocolate hazelnut spread? Let me show you just how simple it is to create this wonderfully creamy and healthy spread in your own kitchen:
Homemade Chocolate Hazelnut Spread
Ingredients
- 3 cups raw or roasted unsalted hazelnuts
- 1 tsp pure vanilla extract
- 1/2 tsp sea salt
- 2/3 cup dairy-free dark chocolate chopped
Instructions
- Preheat your oven to 180°C (350°F).
- Spread the raw hazelnuts on a baking sheet in a single layer and roast for 12-15 minutes, or until fragrant and slightly darkened. If using pre-roasted hazelnuts, roast for 8-10 minutes just to warm the natural oils to help them blend more smoothly.
- Remove from the oven and let the hazelnuts cool slightly. Transfer to a clean kitchen towel and rub them gently to remove as much of the skin as possible. The more skins you remove, the creamier your spread will be.
- Place the peeled hazelnuts into a high-speed blender or food processor. Blend on low speed for approximately 8-10 minutes, scraping down the sides as needed, until a smooth butter forms.
- While blending, melt your chocolate in a heatproof bowl over a double boiler or with steam from a boiling kettle. Set aside once melted.
- Once the hazelnut butter is silky and smooth, add the vanilla extract and salt, then blend to combine.
- Pour in the melted chocolate, one-quarter at a time, blending after each addition until fully incorporated.
- Taste and adjust the sweetness if needed. Add a pinch of stevia, or 1-2 tablespoons of coconut sugar or regular sugar. Note: Avoid using liquid sweeteners as they can firm up the texture of your spread.
- Transfer the finished spread into a clean, dry jar. Store at room temperature for 2-3 weeks, or longer depending on your environment.
Notes
Serving Suggestions and Pairings
Each of these options turns your vegan chocolate hazelnut spread into something even more delicious and memorable. Try them out for an upgraded palate experience:- Try to spread it on toast or banana bread. This is a classic pairing for an indulgent breakfast.
- Stir into porridge or overnight oats for a rich chocolate boost.
- Use as a dip for fruit like apple slices or strawberries.
- Layer it in vegan pancakes or crepes for a special plant-based treat.
- You can drizzle it over ice cream or chia pudding to add sweetness and depth.
Tips for the Perfect Homemade Chocolate Hazelnut Spread
Take your homemade chocolate hazelnut spread from good to unforgettable. These tips can help you achieve a truly indulgent result every time:- Use a high-speed blender. It saves time and delivers a smoother, silkier hazelnut cocoa spread with less effort.
- Sweeten to your taste. Add 1 to 2 tablespoons of coconut sugar or monk fruit for a refined sugar-free chocolate spread.
- Go easy on liquid sweeteners. Too much maple syrup or similar liquids can make your spread stiff. Add sparingly for a balanced texture.
- Swap chocolate with cacao. If you do not have melted chocolate, you can use 3 tablespoons of cacao or cocoa powder after your nut butter forms. Blend well before adding maple syrup, vanilla, and salt.
- Cool before mixing in extras. If your blender warms the mixture, let it cool slightly before adding chocolate to avoid melting it prematurely.
Frequently Asked Questions
- Is homemade Nutella healthier than store‑bought? Yes, because you control the ingredients. You can opt not to use palm oil, put less sugar, and more nuts in this homemade chocolate hazelnut spread. Choosing natural sweeteners like coconut sugar or maple syrup makes it a cleaner, more wholesome option.
- Can I make this spread sugar-free? Absolutely. Replace sugar with dates or a sugar-free sweetener like erythritol or allulose when blending. It still turns out creamy and chocolatey, making a satisfying homemade Nutella without refined sugar.
- How long does the spread last? Stored in a sealed jar in the fridge, your spread can last up to 2 months. At room temperature, it’s good for around two weeks, depending on added ingredients. Always use a clean utensil to avoid contamination.
A Favourite Guilt-Free Chocolatey Treat
From the first wonderfully chocolatey swirl on my morning toast, I felt such pride in creating my own homemade chocolate hazelnut spread. This recipe quickly became a cherished part of my vegan lifestyle and a valuable staple in my kitchen. It is my favourite plant-based chocolate spread because of the guilt-free indulgence it lets me experience. I hope it brings a little moment of pure, delicious joy to your day, just as it does for mine.
Chocolate Hazelnut Spread in Other Chocolatey Recipes
If you loved my creamy vegan homemade chocolate hazelnut spread recipe, you will surely love and enjoy other recipes with this indulging yet nourishing treat, such as my Chocolate Blended Overnight Oats recipe and Chocolate Chip Pumpkin Bread recipe.
We’re here to help you master vegan cooking like a pro! Your thoughts mean the world to us, please share your feedback in the comments below and let’s create delicious magic together!
I’d love to connect with you on my social media channels, do share if you have tried one of my recipes or if you have any requests for recipes, send me a DM! Follow me on Facebook, Instagram, Youtube, Pinterest and TikTok!